A HDR Photograph of Tawonga Huts.

A couple of weeks ago I went up to the Bogong High Plains to photograph Tawonga Huts which are a 4 km walk from Pretty Valley Pondage.  Cattlemen’s huts have been located on the site since the late 1880 and have been rebuilt several times over the years with the most recent one being constructed in the early 1970s.

I arrived at the site around 10:00 am (unfortunately well after sunrise) while it was a cloudy day there were prolonged periods of bright sunshine which made for some challenging lighting conditions.  Ordinarily I would use graduated ND filters to bring down the exposure of the sky however in this instance they would have also unnecessarily darkened the hut I was trying to photograph.  Therefore to try and capture the full dynamic range of the scene I decided to take a bracketed series of photographs (with exposure values of 0, +/-2 and +/-1) with the intention of HDR processing them through Photomatrix Pro.  For these images I used my Pentax K7 and DA* 16-50mm lens, the camera was mounted on a tripod and the shutter was fired with a Pentax cable release.

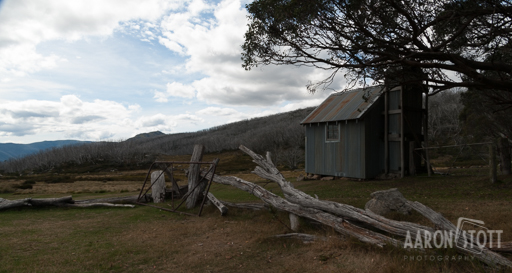
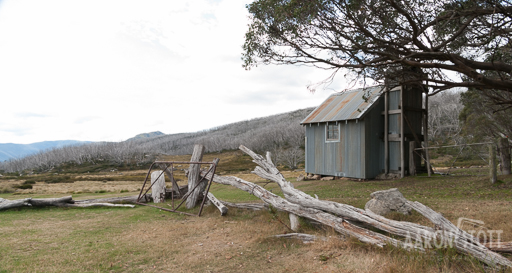
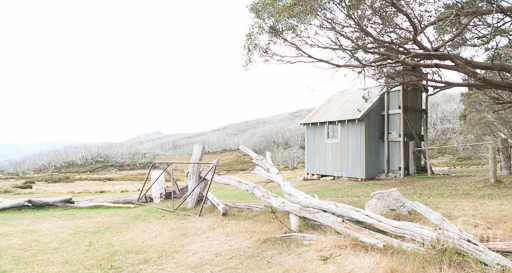
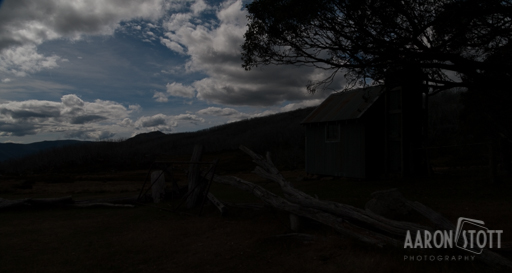
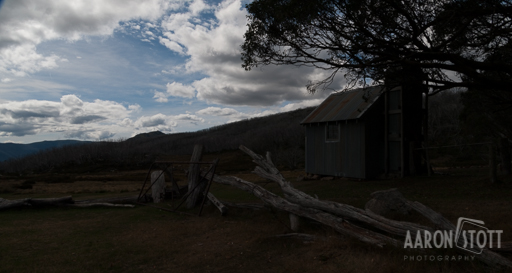
I have included the 5 shots taken below that were used to produce the final image.  These images are the RAW files and are unprocessed, however as you can see I have been able to capture the full dynamic range of the scene with good detail in the sky in the -2 and -1 EV shots, and in the +1 and +2 EV shots I have got a lot of detail recorded in the log fence, shadow areas of the hut and some detail in the overhanging snow gum.

-2 EV

-2 EV

-1EV

-1EV

0 EV

0 EV

+1 EV

+1 EV

+ 2 EV

+ 2 EV

Below is the final image once the above 5 were processed through Photomatrix Pro and Photoshop CC.
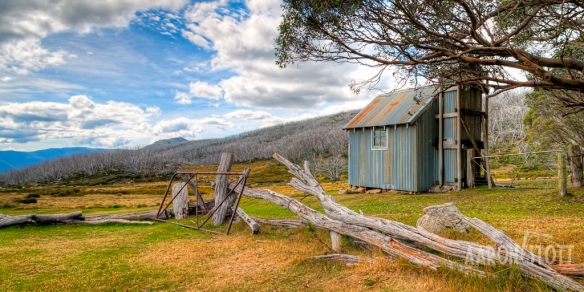
Tawonga Huts.

5 image HDR composite of Tawonga Huts on the Bogong High Plains (Alpine National Park). Pentax K7, Pentax DA*16-50mm, ISO 100, f/11, 1/15sec.

 The final HDR image turned out much better than I had hoped and it is a great representation of the scene; I am really happy with it, it certainly made the 10hrs of driving and 8 km round trip walk worthwhile!

Join the conversation on facebook @ facebook.com/aaronstottphotography

Wallaces Hut

Out of all the huts in the Victorian Alpine region, Wallaces Hut is one of my favorites; its a hut I have visited on many occasions and is something I will never tire of.  Built in 1889 from slabs of snow gums with roof shingles made from woollybutt it is the oldest hut in the Alpine National Park.  Wallaces hut was frequently referred to as the Seldom Seen Inn as it is located among a grove of old snow gums, however it is easily accessed by a short walk from the Bogong High Plains Road approximately 7.5 km from the rocky valley dam wall at Falls Creek.

The photograph below was taken on a particularly chilly morning during late spring after a night of light snowfall.

Wallaces Hut

An old Parks Victoria sign at the hut which has now been replaced gave an evocative description of the location.  I have repeated the text below.

It’s the 1890’s… David Wallace and his three sons Arthur, William and Stewart had recently built the “Seldom Seen Inn”.  They made the hut as a shelter for their visits, when they mustered their cattle off the high plains before the winter snow.

Sitting around the open fire with a cup of billy tea they’d recall their days.

Like when the lean-to door was left ajar and a cow got stuck inside and died!

Or when William was stuck here in bad weather and there was no dry firewood!

With numb hands, a knife and patience, a fire was made…necessity being the mother of invention.

No easy access through the high country in those days, just rough tracks made by cattle and the few bush characters who came here.

If ever you find yourself at Falls Creek take the time to visit Wallaces Hut, its certainly something you won’t regret.

join the conversation on Facebook @ facebook.com/aaronstottphotography
or visit my website at www.aaronstottphotography.com.au

Cope Hut at First Light

I took this photograph of Cope Hut in the Alpine National Park a little over 4 weeks ago just towards the end of dawn.

Pentax K-01, DA* SMC 16 - 50 mm f/2.8, ISO 400, f/14, 1/4 sec.

Pentax K-01, DA* SMC 16 – 50 mm f/2.8, ISO 400, f/14, 1/4 sec.

Murder at Howitt Hut

The title of this post is probably a bit misleading; but it makes the post sound exciting!  Yes there was a murder at Howitt Hut, but this post doesn’t really discuss it all that much, if you are after more information on the murders then Wikipedia is your best friend.

During a trip to the Alpine National Park at the end of 2012 I stopped off at Howitt Hut located on the edge of the Howitt High Plains.  This particular hut has a rather gruesome past as it is connected to a double homicide that occurred in the high country in 1917 and 1918 and have become known as the Wonnangatta murders.  The victims were John Bamford and Jim Barclay and it has long been thought that Bamford killed Barclay, however Barclay’s body was found under a pile of logs near the Howitt Plains hut and to this day the case remains unsolved.

A history of the hut can be found at the Kosciuszko Huts Association website.  In brief, the hut was originally built on the site in 1889, it was rebuilt in the 1920s and then clad with corrugated iron in 1938.  All that remains today of the original hut are the timber roof shingles that can only be seen from inside the hut.

The photograph below dates from approximately 1925 and is from the Museum of Victoria website.

Visiting the hut today it looks very little like it did in the past.  In all honesty its not a very picturesque place to visit, it just looks for all the world like a tin shed in a paddock plus vandals have scrawled graffiti all over the inside to the point where there is no bare space on the walls remaining.  Having said that, these points make it a challenge to photograph and come away with something interesting.  Below are two photographs of the hut that I took in late December 2012.

Howitt Hut 1 - aaron stott photographyHowitt Hut 2 - aaron stott photography

A shot of the hut taken in November 2012.  A bit over processed but the colours on this particular day seemed to be very bright, so I just went with it!

Howitt HutThe inclusion of a couple of additional elements into the scene such as the fence, the trunk of the large snow gum, or the conversion to a gritty black and white each helps add interest to what would otherwise be a rather drab scene.

Join the conversation on Facebook @ www.facebook.com/aaronstottphotography

Huts on the Bogong High Plains

A couple of weeks ago I spent a few days in Falls Creek to do some photography.  Falls Creek is located in the Alpine National Park and provides a convenient starting point to explore the Bogong High Plains.  The high plains were used for many years by local families to graze cattle during the summer months; with several of these families building Huts for shelter after driving their cattle up onto the plains.  Other huts were purpose built as shelters for cross-country skiers and bushwalkers. Some of the huts date back to the 1880s.  The photos below show a small selection of huts.

This first hut is Cope Hut and was built in the late 1920s as a refuge for cross-country skiers, however in summer without any snow the area is covered with wildflowers.

cope hut

This is Fitzgeralds hut and while the original hut which was built in 1903 was burnt down in the mid 1980s, it was rebuilt in the early 1990s in the original style.

fitzgeralds hut

Kellys Hut below is not an original cattlemens hut, this is an old SEC 1928 (electricity commission) hut that is on the site where a hut built by the Kelly family used to stand.kellys hut

I saved the best for last.  This one is Wallaces Hut and is the oldest hut on the high plains being built in the late 1880s, it has survived numerous bushfires and after some recent maintenance is still going strong. wallaces hut

Each time I visit these huts I feel as though I get to step back in time and witness how early pioneers lived in the high country.  If you ever get the chance to pay a visit to Falls Creek the huts are well worth visiting too, especially as most are within an easy day walk.

Join the conversation on Facebook at facebook.com/aaronstottphotography 

Snow gums of the Bogong High Plains

Earlier this week I spent some more time in the Australian Alps and while the Alps are not high or extensive by world standards, they are unique in Australia as they make up just 0.3% of the Australian land mass.

The area I visited was the Bogong High Plains and is part of the Alpine National Park, during winter the plains make up one of the largest snow covered areas in the country.  The majority of the Bogong High Plains are above 1500 meters and the only tree that will grow at this altitude is the snow gum.  These trees often stunted and take on a twisted appearance away from the direction of the strong blasts of prevailing winds.  Below is a series of black and white images of these incredible trees.

snow gum 1 snow gum 2 snow gum 3 snow gum 4 snow gum 5

The Alpine National Park is a remarkable place to visit and while the weather can be challenging, the spectacular scenery more than makes for it.

Join the conversation on Facebook @ facebook.com/aaronstottphotography
Breaking The Rules

Last Sunday I once again paid another visit to the Alpine National Park in Victoria.  While it’s over a 4 hour car trip each way the amazing scenery that awaits you more than makes up for the eight hours stuck in the car.  Of course the camera, tripod, and various filters came along for the trip.

Also this week Pentax Australia started their new monthly Facebook challenge – breaking the rules and coincidently dpreview.com published an article on this very topic.  As far as landscape or nature photography goes, asides from the various rules relating to composition, there are a couple of “rules” that tend to stay in mind when planning a shoot, namely always try to shoot during the hours of sunrise and sunset when the light is softest (the so-called golden hours), and what to do with all the photos when you get home; in particular go easy with Photoshop!

So since it is a 4 hour drive to get to the park and I have the flu at the moment I wasn’t too keen to head off at 1 am to catch the sunrise, and I ended up taking my photos between 10 am to 2 pm, which is generally the worst time of day.  I have also heard the light at this time referred to as pool light as the only thing it’s good for is sitting by the pool.  So since I had already broken the first rule of when to shoot I also broke the second rule (probably a guideline) and went for broke in Photoshop.

So to the photos….

This is Howitt Hut on the Howitt High Plains.

This is the first of three shots of Guy’s Hut on Bryce’s Plain.

This is Pieman’s Falls at Bryces Gorge, which at over 230m is one of the largest waterfalls in Victoria.

Except for the black and white photo which was overexposed by 1 stop and then converted to infrared, all of the ones in colours have had their colour saturation (dramatically) increased, and they have been softened as well.

While I wouldn’t make a habit of shooting or post-processing like this.  I tend to like these shots.  The colour ones in particular have, to me at least, a dream like feel to them, and given that these were taken in the middle of a bright sunny day it goes to show that sometimes it doesn’t hurt to break the rules!

The Pentax K7 – What a Great Camera!

This post isn’t really a review of the Pentax K7 as such, it’s more along what my experiences have been with this camera for the past 2 years.  If you’re after a technical review of the K7 then the one at dpreview.com is a good place to start.

When it came time to purchase my first dSLR I did what most people do and spent a while reading reviews about Canon and Nikon cameras and initially thought that was the way I was going to head too.  But then I stumbled upon this review of the Pentax K10D by Richard Martin.  I remembered the Pentax commercials on TV from the mid-eighties (I think) and their slogan “its a Pentax”; however I hadn’t really heard much about them since then.  But Richards review pointed me in a different direction and I started reading reviews about what was then Pentax’s latest dSLR the K7.  All the reviews that I read indicated that the K7 was worthy of consideration and performed as well, if not better, than the alternatives of the time.

Anyway the time came to purchase so I headed off to the shops and looked / held the various Canons and Nikons that I had been reading about.  I have relatively small hands and all of these cameras felt rather cumbersome and bulky.  But then I held the Pentax K7, and this thing fit me like a glove; I didn’t quite hear angles singing but it was close!  Even though it’s a relatively small camera its built like a tank and feels very solid in the hand.  The initial features that attracted me to the Pentax K7 were that it has a magnesium alloy chassis, it’s backward compatible with legacy Pentax lenses and it is fully weather sealed.  This last feature is particularly important to me as I like to spend quite a bit of time bushwalking and camping in the Alpine National Park and the weather can get very savage.

Even at -7C the K7 kept going longer than I could.

After using this camera for more than two years it handles really well and I still find it an absolute joy to use.  To get the best out of the sensor I think you need to pony up and get some decent glass, i.e. the Pentax line of DA* lenses.  Also I am aware that many people comment on the K7 sensors noise at high ISO settings; I don’t go for the whole photographing a black cat in a box under a bridge in the middle of the night style of photography so the noise hasn’t really been an issue for me.  Besides, any noise that I have come across tends to have a film like quality when printed and doesn’t typically have the harsh chroma type noise that often pops up on other cameras.

I mentioned above that the weather sealing was important to me and in the two years I have been using the K7 it has certainly had a workout.  I have had it in snow storms, its been covered with ash from a steam train.

Both the camera and I got covered in ash taking this shot.

I have had it sprayed with sea water, its been rained on and I have fallen over with it; but it still looks in mint condition.  At this stage I think it’s just going to keep going and going.

Fell over in the dark getting into position for this shot. The camera was fine, but I did a good job on my leg.

I have been trying to think over the last couple of days of any negatives for the K7 for the type of photography I like do however none really come to mind.  If there were in the early days I have just gotten used to them or I have adjusted my shooting habits to suit.  I tend to use the camera mainly in manual mode and haven’t really used the other modes all that much.  I have recently been using it for shooting sports, specifically motocross and dirt bikes, check out my website for some examples, and it’s frame rate of ~5.5 fps is more than enough to capture this fast-moving sport.

All in all I am very happy with the Pentax K7.  It really is a fantastic camera and I am now trying to convince my better half that I need another one as a back up.

Two filters to make your landscape photos pop.

Earlier this year I paid a visit to the Wonnangatta-Moroka section of the Alpine National Park as I wanted to introduce my parents to this incredible park and the walk that I had in mind was relatively easy, i.e. flat, for a high country walk.  This particular walk takes in some of the best features of this section of the park including Bryces Gorge, Piemans Falls and an old cattle mans hut; Guys Hut.  Naturally I also took along my Pentax K7 and DA* f2.8 16 – 50 mm lens.  As Mum and Dad were with me they were not too keen to take advantage of the magic hour at dawn for photography since the park is approximately a 4.5 hr drive from Melbourne.  Nevertheless, there was still some opportunity to take some pictures.

Taking landscape photos can present its own unique set of challenges, particularly if you are including a portion of the sky in your frame.  Often the exposure will be a trade-off between capturing cloud detail in the sky without underexposing the land based components you are trying to capture.  Alternatively you can capture whats interesting on the ground but you typically overexpose the sky rendering it completely white.  The photograph below is a typical example.

No filters were used for this photograph.

As you can see from this photo there is no detail in the sky and the colours are relatively flat.  This is where a polarising filter can help!  Briefly a polarising filter helps to ensure that all of the light captured by your camera comes from the same direction.  This allows for richer colours to be recorded and can also reduce or eliminate reflections on non-metalic surfaces like water.  If you would like more information about polarisers and how they work the luminous landscape has a great tutorial on them.  Most cameras are designed to work with a circular polariser and the one I am using is a Cokin P series circular polariser.  The photo below was taken from the same position as the first photo however this time I have included the polarising filter.

Guys Hut with a Polariser.

The inclusion of the polariser has brought out the colours, particularly in the foreground.  And if you look carefully at the sky in the upper right corner we are now starting to capture a bit of detail in the clouds.

We can still improve this image further by introducing a second filter; a split neutral density filter.  Split neutral density (ND) filters have one half that is completely transparent while the other half is darker, with the degree of darkening varying by a different number of stops depending on what you buy.  To use these filters you place the dark portion such that it cuts the light coming from the brightest portion of the scene preventing its over exposure.  The split ND filter I used for the photo below was a 2 stop Cokin one.

Guys Hut with a Polariser and ND filter

By using both a polarising filter to bring out the colours and a split ND filter to allow cloud detail to be captured the photo has a very different look and feel especially when compared back to the first in the series. To finish the image off it could do with a some dodging and burning particularly on the tree closest to the hut.

By using these two filters you have the potential to save yourself some time post processing and get back to taking more photos.