Gunnamatta Ocean Beach

Over the last few weeks I have been spending quite a bit of time at Gunnamatta Surf Beach which is located in the Mornington Peninsula National Park (Victoria).  The beach is a 3 kilometer long stretch of exposed sandy beach and according to beachsafe.org.au is one of the best surf beaches along the Mornington Peninsula, with consistent 2 m waves all year.  It is however a very dangerous beach with Life Saving Victoria making an average of 113 rescues at the beach each year.  Going to Gunnamatta at the end of winter means I haven’t had to fight the crowds that flock to the beach in summer and it usually just been myself down there and a few keen fishermen.

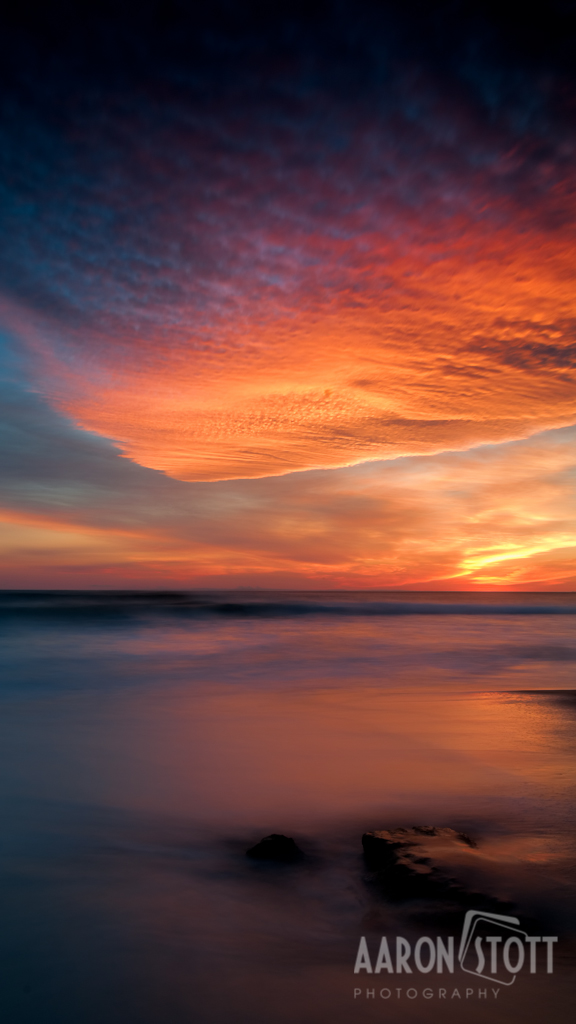
There are several spots along the beach where there are some large rocks in the sand which make for some interesting photographs if you are game enough to get close to them.  This photo below is of one them and was taken late in the afternoon just prior to sunset; just in case you are wondering I got drenched taking this!

Pentax K7, DA21mm limited, ISO 100, f/14, 0.5 sec

Pentax K7, Pentax DA21mm limited, ISO 100, f/14, 0.5 sec

The sunset last Sunday was incredible, the colours were so vivid and constantly changing.gunnamatta sunset - aaron stott photographyAs I mentioned at the start the waves are practically constant at Gunnamatta and you need to keep you remain alert and keep your eyes open, I didn’t and it caused the loss of my DA* 16-50 mm, f/2.8 SDM lens.  So my next post will be on seascape photography tips that no one else will tell you!
Join the conversation on Facebook @ facebook.com/aaronstottphotography

or visit my website at www.aaronstottphotography.com.au

Wildflowers in the Victorian High Country

The photograph below of alpine wildflowers was taken at the end of December 2012 near the start of the Crosscut Saw in the Alpine National Park.

wild flowers in the victorian alps - aaron stott photography

Pentax K7, ISO 100, f/11, 1/50 sec, Pentax SMC DA* 16 – 50 mm f/2.8.

Join the conversation on Facebook @ facebook.com/aaronstottphotography

Getting Wet Feet at Half Moon Bay

Last Saturday evening I went down to Half Moon Bay near Sorrento in Victoria to take a few photographs of the days sunset.  The bay is about a 2.5 Km walk from the car park and it is a quiet secluded beach surrounded by sandstone cliffs.  Standing on one of the rock platforms watching the sunset I grabbed this shot just as the sun touched the horizon.

half moon bay 1 - aaron stott photographyHowever while this was going on, to my left and behind me, the sound of the waves crashing against the rocks I was standing on seemed to be getting louder and louder.  I put the camera onto burst mode turned around and took the following shots.

This first one is of one of the waves as it just hits the rocks.

half moon bay 2 - aaron stott photographyThen eight seconds later this is the next shot and before I knew it both the tripod and I were up to our ankles in seawater.half moon bay 3 - aaron stott photographyThis continued on and off while I was taking my photos of the sunset and made for a wet walk back to the car in the dark.  But it was worth it, I came away with a good shot of the sunset and had a blast as well!

Join the conversation on Facebook @ facebook.com/aaronstottphotography

Snow gums of the Bogong High Plains

Earlier this week I spent some more time in the Australian Alps and while the Alps are not high or extensive by world standards, they are unique in Australia as they make up just 0.3% of the Australian land mass.

The area I visited was the Bogong High Plains and is part of the Alpine National Park, during winter the plains make up one of the largest snow covered areas in the country.  The majority of the Bogong High Plains are above 1500 meters and the only tree that will grow at this altitude is the snow gum.  These trees often stunted and take on a twisted appearance away from the direction of the strong blasts of prevailing winds.  Below is a series of black and white images of these incredible trees.

snow gum 1 snow gum 2 snow gum 3 snow gum 4 snow gum 5

The Alpine National Park is a remarkable place to visit and while the weather can be challenging, the spectacular scenery more than makes for it.

Join the conversation on Facebook @ facebook.com/aaronstottphotography

Marysville and Lake Mountain – Three Years on From Black Saturday

On the 7 February 2009 Victoria was ravaged by a series of bushfires that became known as Black Saturday.  Tragically over 170 people lost there lives, while more than 7500 people were left homeless.  The fires burnt an area of over 4,500 km² (450,000 hectares, 1.1 million acres).  Two weeks ago I paid a visit to the forests around the town of Marysville (which was practically destroyed during the blaze) and the alpine ski resort Lake Mountain.  Below is a small selection of photos from my trip.

View towards Lake Mountain showing Alpine Ash skeletons.

Myrtle Beech re-growth near Marysville.

Road towards Lake Mountain summit.

Forest canopy remains near Marysville.

Alpine Ash skeleton at Lake Mountain.

Many businesses in Marysville have re-opened and Lake Mountain is also open.  Its a great area to visit with many attractions including bushwalking, day spas and restaurants.

Join the conversation on Facebook @ www.facebook.com/aaronstottphotography

Breaking The Rules

Last Sunday I once again paid another visit to the Alpine National Park in Victoria.  While it’s over a 4 hour car trip each way the amazing scenery that awaits you more than makes up for the eight hours stuck in the car.  Of course the camera, tripod, and various filters came along for the trip.

Also this week Pentax Australia started their new monthly Facebook challenge – breaking the rules and coincidently dpreview.com published an article on this very topic.  As far as landscape or nature photography goes, asides from the various rules relating to composition, there are a couple of “rules” that tend to stay in mind when planning a shoot, namely always try to shoot during the hours of sunrise and sunset when the light is softest (the so-called golden hours), and what to do with all the photos when you get home; in particular go easy with Photoshop!

So since it is a 4 hour drive to get to the park and I have the flu at the moment I wasn’t too keen to head off at 1 am to catch the sunrise, and I ended up taking my photos between 10 am to 2 pm, which is generally the worst time of day.  I have also heard the light at this time referred to as pool light as the only thing it’s good for is sitting by the pool.  So since I had already broken the first rule of when to shoot I also broke the second rule (probably a guideline) and went for broke in Photoshop.

So to the photos….

This is Howitt Hut on the Howitt High Plains.

This is the first of three shots of Guy’s Hut on Bryce’s Plain.

This is Pieman’s Falls at Bryces Gorge, which at over 230m is one of the largest waterfalls in Victoria.

Except for the black and white photo which was overexposed by 1 stop and then converted to infrared, all of the ones in colours have had their colour saturation (dramatically) increased, and they have been softened as well.

While I wouldn’t make a habit of shooting or post-processing like this.  I tend to like these shots.  The colour ones in particular have, to me at least, a dream like feel to them, and given that these were taken in the middle of a bright sunny day it goes to show that sometimes it doesn’t hurt to break the rules!

Two filters to make your landscape photos pop.

Earlier this year I paid a visit to the Wonnangatta-Moroka section of the Alpine National Park as I wanted to introduce my parents to this incredible park and the walk that I had in mind was relatively easy, i.e. flat, for a high country walk.  This particular walk takes in some of the best features of this section of the park including Bryces Gorge, Piemans Falls and an old cattle mans hut; Guys Hut.  Naturally I also took along my Pentax K7 and DA* f2.8 16 – 50 mm lens.  As Mum and Dad were with me they were not too keen to take advantage of the magic hour at dawn for photography since the park is approximately a 4.5 hr drive from Melbourne.  Nevertheless, there was still some opportunity to take some pictures.

Taking landscape photos can present its own unique set of challenges, particularly if you are including a portion of the sky in your frame.  Often the exposure will be a trade-off between capturing cloud detail in the sky without underexposing the land based components you are trying to capture.  Alternatively you can capture whats interesting on the ground but you typically overexpose the sky rendering it completely white.  The photograph below is a typical example.

No filters were used for this photograph.

As you can see from this photo there is no detail in the sky and the colours are relatively flat.  This is where a polarising filter can help!  Briefly a polarising filter helps to ensure that all of the light captured by your camera comes from the same direction.  This allows for richer colours to be recorded and can also reduce or eliminate reflections on non-metalic surfaces like water.  If you would like more information about polarisers and how they work the luminous landscape has a great tutorial on them.  Most cameras are designed to work with a circular polariser and the one I am using is a Cokin P series circular polariser.  The photo below was taken from the same position as the first photo however this time I have included the polarising filter.

Guys Hut with a Polariser.

The inclusion of the polariser has brought out the colours, particularly in the foreground.  And if you look carefully at the sky in the upper right corner we are now starting to capture a bit of detail in the clouds.

We can still improve this image further by introducing a second filter; a split neutral density filter.  Split neutral density (ND) filters have one half that is completely transparent while the other half is darker, with the degree of darkening varying by a different number of stops depending on what you buy.  To use these filters you place the dark portion such that it cuts the light coming from the brightest portion of the scene preventing its over exposure.  The split ND filter I used for the photo below was a 2 stop Cokin one.

Guys Hut with a Polariser and ND filter

By using both a polarising filter to bring out the colours and a split ND filter to allow cloud detail to be captured the photo has a very different look and feel especially when compared back to the first in the series. To finish the image off it could do with a some dodging and burning particularly on the tree closest to the hut.

By using these two filters you have the potential to save yourself some time post processing and get back to taking more photos.

What to Photograph on a Rainy Day.

Over the last week or so in Melbourne we have had a fair number of rainy days, plus it’s winter and the amount of daylight hours are relatively short.  All of this makes it difficult to get some photography done.  So what do you photograph when the weather will not play nice?  Well I decided to shoot the rain drops.

During the odd break in the rain I would grabbed my Pentax K7 (love the fact that it’s weather sealed) and attached my Tamron 90 mm f2.8 SP Di Macro lens and headed outside.  This first shot was taken at f22, which on a “normal” lens would give a very long depth of field, but as you can see from this shot the area behind the leaf has been rendered as out of focus.

Eucalyptus leaf

Rain drops resting on a new Eucalyptus leaf.

This second shot was taken at f3.2 and shows a very shallow depth of field.

Hakea rain drops

Rain drops clinging to a Hakea

Using a macro lens presents a unique set of challenges.  The first of which as you can see from these two examples is their extremely shallow depth of field; even when stopped down to f22.  This can present a challenge for accurate focusing so having a sturdy tripod can be a big help as it will prevent the camera from moving.  I’ll post some more detailed comments on macro photography in a future post.

Even if the weather is not on your side there is still likely to be an opportunity to do some photography.  Keep your eye on the window and when the rain stops go outside and take some photos!